Saturday, March 4, 2017

Girl's day (Hinamatsuri) sushi cake


March 3rd is a "Hinamatsuri"-Girl's day in Japan. 

This year, I made a very easy and cute sushi cake!


Monday, January 30, 2017

How to make banana muffin

I used to make pastries and confections all the time.
This is one of the easiest, yet the best recipe by far.

When you have some ripe bananas hanging around, this recipe comes out better!


1. Mix two eggs and 100grams of brown sugar in a bowl.  Whisk them very well.


2. Add 80grams of vegetable oil, and 30grams of yogurt, then mix well.


3. Add two ripe bananas, they are so ripe and super easy to mash in a bowl.
If it is a little bit hard to mash, you can always use a fork to mash before you mix in to the bowl with the other ingredients.


I like a little chunk to be seen.


4. Add a little spoon of baking powder and 150grams of sifted flour.


This is an old and beaten up muffin tin, but it is a great size!
So I line this pan with muffin cups.
We can make 8 muffins perfectly.


5. Bake 14-18min in 350F oven.


They are delicious and so moist!
I sometimes jazz it up by adding some spices (nutmeg, cinnamon) or nuts or even chocolate chips!


How to make best lemonade ever!


Whenever it is lemon season, we should take advantage, right?
Since the Meyer lemon tree outside bears so many of them!


You only need:

6 juicy lemons
6 cups of water
1 cup of sugar
2 cups of ice cubes


1. Cut the lemons in half, and squeeze the juice out.


2. In a med sauce pan, pour 6 cups of water and a cup of sugar.

3. Turn the heat to med high, and stir the water and sugar mixture until the sugar dissolves completely.

 4. Cool the sugar water.


5. Add the fresh squeezed lemon juice and ice cubes, and the sugar water, then chill in the fridge.


Cutely enough, there are so many baby lemons are in the branches!

More to come!


Serve with lots of ice. 
This is a great drink for kids and adults.
Of course my daughter drinks it straight up!

It can be mixed with good liquor or even simple soda water!

Sunday, January 29, 2017

How to make Shio-Lemon and...


For a while, "Shio-Lemon (Salt and lemon)" was the "it" thing in Japan.
It is supposed to be a Moroccan condiment, and it is very versatile when it comes to cooking vegetables, meat, and even fish!

So I thought this should be our new seasoning because our house's Meyer lemons are growing beautifully. 

But first, we need to make this condiment, and it takes a little while.
Needs: Big mason jar, 3 big juicy lemon (500gram), good sea salt (50gram 10% of lemon)
1. Cut the lemon into wedges (maybe into 1/8).
2. Place them to the sanitized jar, and then add salt.
3. Leave the jar in the fridge. Shake it in 2-3 days for the salt to be dissolved thoroughly.
You can use it in a week or so, but the good flavor kicks in when you leave it for a month.

The lemon's acidity and the salt become much more mild!


 Using this newly introduced condiment, we will make grilled chicken today!


1. Cut some chicken breasts into bite sizes. (I usually eliminate any fat because my family does not like the fatty parts)


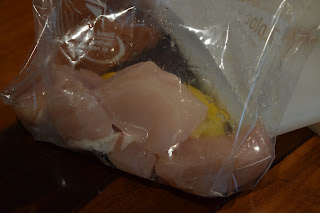
2. Place all the meat in a zip lock and pour some of the "Shio Lemon." 
(I used one wedge of lemon for 2 chicken breasts today.)  And massage the zip lock a little in order for the lemon to be squished and the chicken to absorb the flavor.


3. After one hour in the fridge, take out the chicken pieces and grill them on a griddle (or BBQ, whichever works for you!).


4. Leave a couple of min before turning to achieve the grill marks :)  YUM!


5. Cook thoroughly.


So I made some creamy pasta and topped it with the Shio-Lemon grilled chicken.
Juicy and flavorful!


Friday, January 27, 2017

How to make Niku-jyaga


If you could make this by heart, you are truly Japanese...
It is the food people think of when they are asked what is mama's home made cooking.
It is very simple, and always home-y.


1. Cut 3 potatoes, 2 carrots, and 1 onion into bite sizes. 

2. Oil well and heat a medium sauce pan, and then start to stir in the potatoes and carrots.


While it's cooking, we are going to do a little prep.
We want some green and some texture. 
So today, I chose green peas! (it can be sugar peas or green beans, etc...)


So I always think "Shirataki" is a must-item for Niku-jyaga.

Let's ask Wiki again...
Shirataki is a thin, translucent, gelatinous traditional Japanese noodles made from the konjac yam (devil's tongue yam or elephant yam).  The word "shirataki" means "white waterfall", describing the appearance of these noodles. Largely composed of water and glucomannan, a water-soluble dietary fiber, they are very low in digestible carbohydrates and calories, and have little flavor of their own.

Shirataki noodles can be found both in dry and soft "wet" forms in Asian markets and some supermarkets. When purchased wet, they are packaged in liquid. They normally have a shelf life of up to one year. Some brands may require rinsing or par-boiling as the water they are packaged in has an odor that may be unpleasant to those not accustomed to it.
Alternatively, the noodles can be drained and dry roasted. This gets rid of the bitterness. It also makes the noodles have a more pasta-like consistency. Dry roasting is done by placing noodles in a non-stick skillet on high for a minute or until you hear a slight squeaking noise when moving them around. After that they are ready to be added to soup stock or have a sauce added to them.


3. Wash "Shirataki" in a colander with water. 


4. After the potatoes and carrots are a little cooked, pour in the washed "Shirataki," and onions.


5. Cut up a little bit of thinly sliced beef.  After "Shirataki's" liquidness is mostly gone and the onions are somewhat translucent, stir in the meat.


6. After the meat is halfway cooked, splash in 2 big spoons of sake and a cup of hot water
and bring the heat to high.


We need a good sake for cooking as well...
Today I used one from my home town :)


7. Once it is boiled, turn the heat to med-low, and scoop up some scum with a ladle. 

8. Add a 1/2 big spoon of granulated sugar and boil for 5min.

9. Add 2 big spoons of soy sauce and stir thoroughly.


,
10. Use "Otoshi-buta" to keep all the good liquid and leave it on med low for 15-16 min, stirring occasionally. 

11. After potatoes are soft, add the color! Green peas!! 
Serve it while it is hot and hearty!!


Tuesday, December 27, 2016

How to make Nukazuke (Rice Bran Pickeles)


So I always fancied to have my own nukazuke.  As a Japanese, it is essential to have your pickles. 
I wasn't appreciating it until I grew up a little.  I mean I always loved grandma's home made pickles that she always did in the shack in front of our house with nails and eggplants.  And my mom's
seasonal home grown veggies "asazuke pickles." 

And of course, my dad's nukazuke that he seems he can't never ever get it right. 
Yes, Nukazuke takes a lots more (?) efforts I guess. 
It is like growing your own child, you have to take care of them and pamper them constantly. 
Yet, the result of this method is very rewarding. 
You will get perfectly healthy fermented and pickled veggies everyday if you succeed.

And since the day I found the Nukazuke kit from Nijiya, a Japanese market I always go to, I couldn't resist to try :)
What a fun project!!

So I bought this...

And it comes with,
1. Organic rice bran (containing soy sauce powder)
2. Salt
3. Kombu (dried kelp)
4. Red Chili pepper
and very much hands on and detailed instruction, yay!


I simply followed the instruction in order to make a rice bran bed for pickles, which is called "Nukadoko."

1.  Prepare a salt water with the salt from the kit. 
Then mix the salt water with the rice bran.

Before I can start actual pickling, I have to prepare
"the bed" in a way that is moist and ready for fermentation. 
In order to do that, I had to add vegetable trimmings to the mixture.  These vegetables replenish the nukadoko with nutrients and provide adequate moisture necessary for the fermentation process. 
So I added daikon greens and cabbage for that, and finally added kelp and seeded red pepper that came with the kit. 

So here comes the hard part!  For the first week after the nukadoko is made, I have to stir it thoroughly from the bottom to the top twice daily, in the morning and the evening!

It says "after about a week of the initial preparation, start pickling vegetables in the nukadoko.  Try to pickle everyday if possible, even by a small amount.  The nukadoko will be futhre fermented, gradually improving the flavor and taste of your pickled vegetables."


It's been more than 10 days now.  I have had a couple of nukazuke cucumbers and carrots!
They weren't that fragrant yet, and a little bit salty. 
Just now, I embedded a daikon radish and a celery. 

I know I can adjust it to my liking someday.

Cuz I DO see that this "bed" and I have a great and hopeful future together!

How to make stollen inspired pound cake


For last couple years, I started appreciate Christmas related baked goods. 
Stollen is one of them. 
I love its buttery aroma and combination of nuts and dry fruits. 
I never could have enough.
But it was such a last minute that I decided to make stollen this year.
So I made Stollen inspired pound cake instead for the Christmas dinner dessert!
It is so much easier and dessert-ier than conventional Stollen.
 
Well...
I soaked raisins and dried cranberries in a 1 big spoon of dark rum for more than 15min.
(You can have fun with this combination! chopped dried apricot, fig, cherry!
whatever suits your tongue)
And Preheat the oven 350F.


1. Melt 80grams of unsalted butter in a microwave, and set it aside until it cools.


2. In a medium bowl, mix two eggs and 70grams of sugar, and 60cc of milk. 
Add melted butter, mix well.  Zest 1/3 lemon and add.


3. Shift 200grams of flour and little a spoon of baking powder, then add it to egg mixture gently. 


4.  Add dry fruits along with rum that they are soaked in.


                  5.  Lightly fold with rubber spatula.
                       Add chopped nuts as well.


Toasted nuts are must.!
I used walnuts and pecan today, but you can choose whatever you want to put in it.
Make sure to crisp them up beforehand.
They are easily burnt so keep an eye on it!


                                    6.  Line the mold with parchment paper. 


7.  Pour the batter in the mold and smooth out the top with rubber spatula.
Bake for 35min until a toothpick inserted into the center comes out clean.   
Then, melt a big spoon of unsalted butter, and brush it onto the cake while it is still hot.


The result is rewarding!


8.  Shake lots of powdered sugar for the look!
So Christmas!

It did not last long in my house :)
But it can be a great gift and little dessert for potluck especially in this season.